Overview

In 2021 my wife asked me to develop a new sound machine for the kids. Many of the features of the old sound machine were unneeded. In addition to that; the old sound machine required speakers and was quite cumbersome to transport.
We also realized that the old sound machine didn't work well in travel situations. If we were staying at a hotel or house we may not have easy access to a power plug.
We also realized that the old sound machine didn't work well in travel situations. If we were staying at a hotel or house we may not have easy access to a power plug.
Conception and design
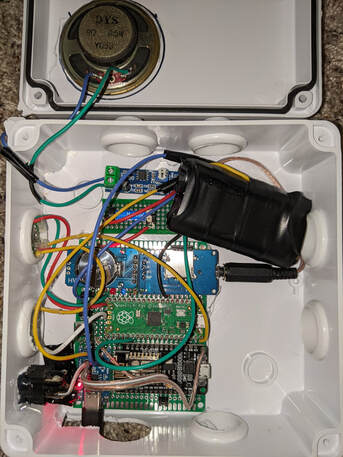
The new sound machine was based on the Raspberry PI Pico; a microcontroller. This eliminated the need for a Linux OS and made it safer to disconnect from power.
Of course the idea of this new sound machine ever losing power is almost laughable. Included in the system are two 3.7v lithium cells. When the sound machine is plugged in the cells are charging, however when disconnected from power the sound machine remains on.
Since this new machine uses a microcontroller, it uses considerably less power than its predecessor and can remain on battery power for around 8 hours. Included in the design is an RTC module to ensure that the time is accurate.
This sound machine only plays music for a few hours to get my kids to sleep. It then leaves it's red light and white nightlight on to indicate that it's time to sleep. In the morning the green light comes on steady indicating that it's okay to get up.
At 6:30AM the green light shuts off and the device goes into standby mode, blinking the green light every few seconds just to indicate that it's still alive.
The DAYLIGHT SAVINGS TIME problem
One of the challenges for this new sound machine was keeping the correct time. Obviously it would be extremely annoying to have to manually set the time on twice each year. So I came up with a solution using the ESP8266 Node MCU as a co-processor. The ESP8266, while it has limited GPIO, it does have a built-in Wifi module. The code on the ESP8266 is simple, it periodically gets the current time from NTP and reports it to the Raspberry PI Pico.
One problem I ran into early on was that the ESP8266 doesn't have enough GPIO pins to communicate with the serial MP3 module, audio power relay and color LEDs. That's where the Pico comes in. It has plenty of GPIO and can handle that work load.
One problem I ran into early on was that the ESP8266 doesn't have enough GPIO pins to communicate with the serial MP3 module, audio power relay and color LEDs. That's where the Pico comes in. It has plenty of GPIO and can handle that work load.
Communication Conflict
Getting the ESP8266 and Pico to talk was quite a challenge. My original idea was to use I2C; its simple fast and I've worked with it a lot. The problem is both the ESP8266 and the Pico are really good at being I2C masters but neither of them support being an I2C slave.
So I pulled out my old serial hand shaking communication protocol. I used this protocol on some of the JConsoles a long time ago. It uses a sending, data and acknowledge line to send serial data. The Pico has no reason to talk to the ESP8266 so the ESP8266 drives the communication between the two processors; initiating contact when it has an updated time stamp.
So I pulled out my old serial hand shaking communication protocol. I used this protocol on some of the JConsoles a long time ago. It uses a sending, data and acknowledge line to send serial data. The Pico has no reason to talk to the ESP8266 so the ESP8266 drives the communication between the two processors; initiating contact when it has an updated time stamp.
Sound
A sound machine isn't a sound machine without sound. You may be wondering how I got the sound to work without having a Linux OS to manage sound for me. The secret sauce is a serial MP3 player module. The module takes a micro-SD card for MP3 files. It has a 1/8" stereo audio output and is controlled with simple serial commands. The Pico talks to the module using a couple of it's UART pins.
Unlike the previous sound machine I wanted to avoid external speakers. So I bought an LM386 audio amplifier module and used that with an 8 Ohm speaker to provide the output. One challenge I had was that the LM368 amplifier can be noisy when there's no audio playing. That's where the relay comes in handy. A reed relay controls power to the LM386. When the amplifier isn't in use the reed relay cuts power to it.
Unlike the previous sound machine I wanted to avoid external speakers. So I bought an LM386 audio amplifier module and used that with an 8 Ohm speaker to provide the output. One challenge I had was that the LM368 amplifier can be noisy when there's no audio playing. That's where the relay comes in handy. A reed relay controls power to the LM386. When the amplifier isn't in use the reed relay cuts power to it.
Status
The sound machine is actively in use, however I have no plans for any additional software or hardware changes. This is one of my finest projects.
